Over the last decade and more, mapping services have been made available to developers through various APIs. And, each year, their sophistication grows continually. It’s very impressive what’s available to us now out of the box, and you can be up and running within minutes. However, as the title of this article states, let’s look at what we can do with mapping in a UWP (Universal Windows Platform) app.
If you’ve never playing around with UWP apps yet, don’t worry; what we’ll be covering in this article will be kept to the basics. The first thing we’ll need is an installation of Visual Studio 2017.
I’ll be making use of VS 2017; the latest update at the time of this writing is 15.0.26430.6. Some older versions may be useable for this example; however, a lot of what we’ll be looking at here was demonstrated at MS Build 2017. And, unless you’re fully up-to-date, some features may not be available to you. Therefore, I would recommend you perform any updates if needed.
Putting Together the Application
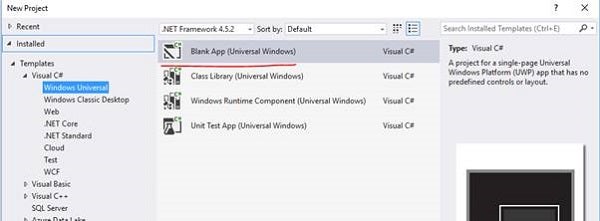
Using the default templates from VS, create yourself a blank UWP application.
Figure 1: Selecting the template from the New Project dialogue
Once created, you should have a solution that looks something like this…
Figure 2: The empty UWP solution
For the first part of this article, we’ll be focusing our attentions on the MainPage.xaml file, which you can see highlighted in Figure 2. Open it up, and let’s make a small addition to our XML namespace listings at the top of the file.
<Page
   x_Class="Mapping.Example.MainPage"

   xmlns_x="http://schemas.microsoft.com/winfx/2006/xaml"
   xmlns_local="using:Mapping.Example"
   xmlns_d="http://schemas.microsoft.com/expression/blend/2008"
   xmlns_mc="http://schemas.openxmlformats.org/markup-compatibility/2006"
   xmlns:mapControl="using:Windows.UI.Xaml.Controls.Maps"
   mc_Ignorable="d">

   <Grid Background="{ThemeResource ApplicationPageBackgroundThemeBrush}">

   </Grid>
</Page>
The line I’ve added is the one left highlighted (in bold), beginning with xmlns:mapControl. Once added, we can go ahead and add the mapping control to our XAML. Use the following code as a guide…
<Grid Background="{ThemeResource
   ApplicationPageBackgroundThemeBrush}">
   <mapControl:MapControl/>
</Grid>
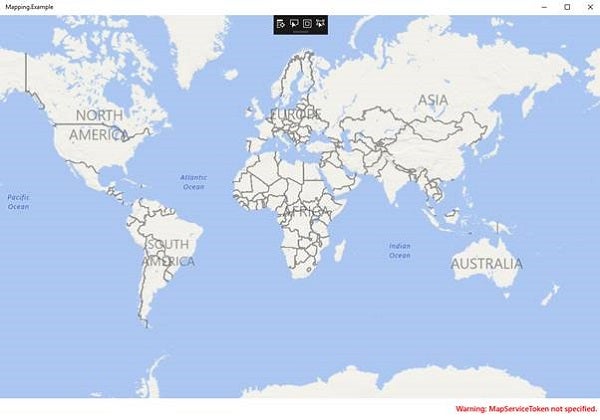
At this point, we have a semi-functional UWP app that will give you a useable map. Go ahead and run the app, on the local machine, and observe the result.
Figure 3: The UWP mapping app running
This very simple application proves to us how easy it is to get going. Also, you may have noticed we haven’t added any NuGet packages during our initial setup. We don’t need to; everything we need is given to us out of the framework.
If you want to take a moment to play around with the map, you’ll find it responds to input such as mouse, keyboard, and touch for zooming and panning. Again, this is without us having to do anything extra at this point.
However, if you’ve worked with UWP before, you’ll probably be aware that you can access the device’s geo-location—assuming, of course, the user has given the needed permissions. But, if we did have this location, how might we set up our app to zoom the map to this location on start-up? Let’s take a look…
We’ll need to name our MapControl to make it available to us in the code behind. I’ve made this change to the XAML.
<Grid Background="{ThemeResource
   ApplicationPageBackgroundThemeBrush}">
   <mapControl:MapControl x_Name="mapControl"/>

</Grid>
Now, we’ll need to create an event handler for our MapControls‘s ‘Loaded’ event in the mainpage.xaml.cs file. And, in that event, we’ll zoom the map in using the MapControl.zoomLevel property, and set the geo-location using the map’s Center property. Take a look at the next code segment…
void Map_Loaded(object sender, RoutedEventArgs args)
{
   mapControl.Center = new Geopoint(
      new BasicGeoposition()
         { Latitude = 0, Longitude = 30 });

   mapControl.ZoomLevel = 10;
}
Now, I’ve set the Center of our map to a geo-location of latitude 0 and longitude 30. Off the top of my head, these co-ordinates should give us a location somewhere in Africa. Do note, the value types of latitude and longitude is double. And, the values are restricted to -90—90 for latitude, and -180—180 for longitude. If you’re familiar with mapping and co-coordinates, these ranges will be familiar to you for very good reasons.
Once we have our event handler created, attach it to your control in the XAML like so…
<Grid Background="{ThemeResource
      ApplicationPageBackgroundThemeBrush}">

   <mapControl:MapControl x_Name="mapControl"
                          Loaded="Map_Loaded"/>

</Grid>
Run the app, and let’s see where we end up…
Figure 4: The map zoomed in on the location at start-up
As we can see in Figure 4, we’ve ended up at a location in Africa, Zooming out might give us a better idea where that is in relation to other areas in the country.
Conclusion
What we’ve covered he is just the little bit on the top of the cake. Just by exploring the properties available on the MapControl, it’s immediately visible there is a lot you can do with it. Go forth and experiment, and if you have any questions I’ll be around on Twitter @GLanata.


