If you are already familiar with the Universal Windows Platform (UWP), you can jump down to our coverage of adding camera support. If not, read on!
Introduction to the Universal Windows Platform (UWP)
A Universal Windows Platform app can run on any Windows-based device, from your phone to your tablet or PC. With a UWP app, you can design for specific input modes and devices, but you aren’t required to. This is because UWP apps rely on smart interactions by default. This means that you can design around a click interaction without having to know or define whether the click comes from an actual mouse click or the tap of a finger. UWP apps can automatically adjust the size of fonts, controls, and any other UI elements so that they are legible on all devices.
UWP provides useful building blocks that make it easier to design apps for multiple device families. For example, UWP provides a set of universal controls that are guaranteed to work well on all Windows-powered devices. This set of universal controls includes everything from common form controls, such as radio buttons and text boxes, to gridviews and listviews.
UWP apps automatically get a default set of styles, which includes the following features:
- Automatic support for high-contrast modes
- Automatic support for other languages
- Default animations for interactions
- A set of styles that automatically gives your app a light or dark theme
- Built-in support for RTL reading order
- A Segoe-based type ramp that ensures that app text looks crisp on all devices
The first thing you need to do to build a UWP app is to obtain a developer license. A developer license is needed to develop and test a Windows Store app before the Store can certify it. When you run Visual Studio for the first time, it prompts you to obtain a developer license. Read the license terms and then click I Accept if you agree. In the User Account Control (UAC) dialog box, click Yes if you want to continue.
You will need to register your Windows Phone to test your Windows Phone Store app and to be able to enable your device for development. To register your phone, follow this step-by-step.
To Enable your device, follow this handy step-by-step guide.
Our Project: UWP Camera Support
Now that you know what makes a UWP app tick and how to create a basic one, let’s explore how to add Camera features to a UWP app. If you are running Windows 8.1 and Visual Studio 2015, please follow the next steps to create a UWP app.
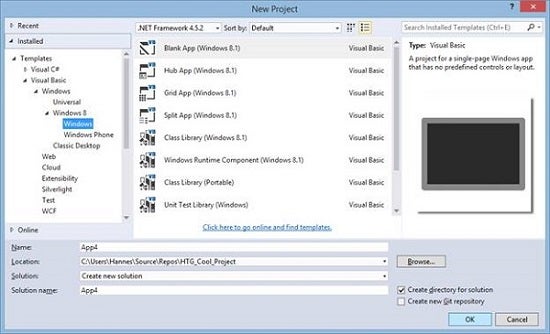
- Open Visual Studio 2015.
- Select Visual Basic as the Programming Language.
- Expand Windows.
- Expand Windows 8.
- Select Windows. Your screen should resemble Figure 1:
Figure 1: New Project - Name the application anything you want.
Side Note: Visual Studio 2015 Installation
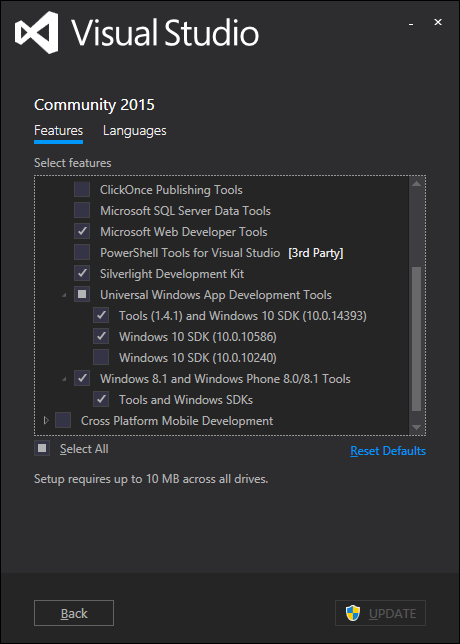
In case you are experiencing difficulties selecting the appropriate Project Type, or if the Project types aren’t there, you most likely need to modify your visual Studio 2015 installation. Ensure that you install the following, enabling you to create the UWP projects:
- Universal Windows App Development Tools
- Windows 8.1 and Windows Phone 8.0/8.1 Tools
Figure 2: VS 2015 Install
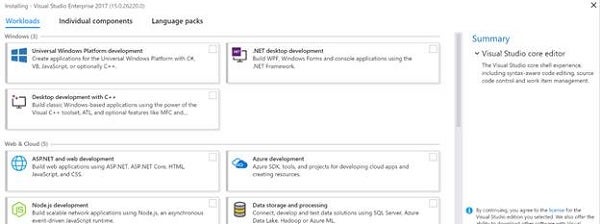
If you are running Windows 10 and Visual Studio 2017, please follow this tutorial to create a UWP app. Also, ensure that you have installed the necessary Visual Studio 2017 tools for UWP app development, as shown in Figure 3.
Figure 3: VS 2017 Install
Adding Camera Support
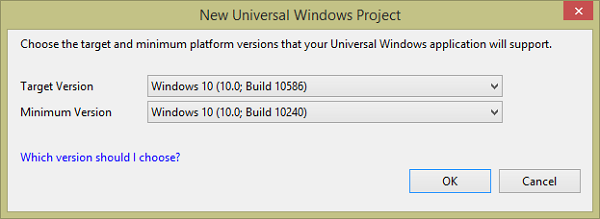
To add the camera support, you might have to set the appropriate version in the displayed dialog box (see Figure 4).
Figure 4: Setting the appropriate version
Designing Our UWP Camera App
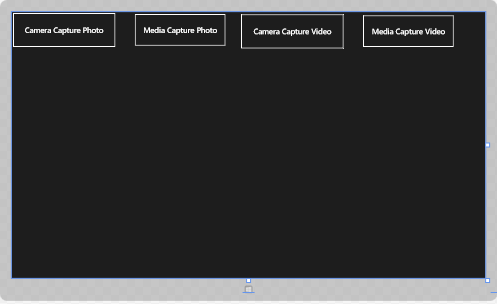
Once your project has loaded, design your page as shown in Figure 5. Add 4 buttons, MediaElement, and 1 Image.
Figure 5: Design
There are essentially two ways to manipulate the app’s Camera: CameraCaptureUI and MediaCapture.
Using CameraCaptureUI to Capture Video
The CameraCaptureUI class can be used to capture photos and videos by using the camera UI built into Windows. Add all the necessary Imports for your app:
Imports System
Imports Windows.Graphics.Imaging
Imports Windows.Media.Capture
Imports Windows.Media.MediaProperties
Imports Windows.Storage
Imports Windows.Storage.FileProperties
Imports Windows.Storage.Streams
Imports Windows.UI.Xaml.Media.Imaging
Add the following code to use the CameraCaptureUI class to capture a photo:
   Private Async Sub btnCameraPhoto_Click(sender As Object, _
         e As RoutedEventArgs) Handles btnCameraPhoto.Click

      Dim dlgCamera As New CameraCaptureUI()
      Dim szAspectRatio As New Size(20, 10)

      dlgCamera.PhotoSettings.CroppedAspectRatio = szAspectRatio

      Dim sfPhoto As StorageFile = Await dlgCamera.CaptureFileAsync _
         (CameraCaptureUIMode.Photo)

      If sfPhoto IsNot Nothing Then

         Dim biPhoto As New BitmapImage()

         Using fsStream As IRandomAccessStream = Await _
               sfPhoto.OpenAsync(FileAccessMode.Read)

            biPhoto.SetSource(fsStream)

         End Using

         imgPhoto.Source = biPhoto

      End If

   End Sub
I created a CameraCaptureUI object and set its aspect ratio. With the use of CaptureFileAsync, I capture the photo and save it with the help of the StorageFile class. Lastly, I display the image inside the Image control. Add the next code to capture a video with the help of the CameraCaptureUI class:
   Private Async Sub btnCameraVideo_Click(sender As Object, _
         e As RoutedEventArgs) Handles btnCameraVideo.Click

      Dim dlgVideo As New CameraCaptureUI()

      dlgVideo.VideoSettings.Format = CameraCaptureUIVideoFormat.Mp4

      Dim sfFile As StorageFile = Await dlgVideo.CaptureFileAsync _
         (CameraCaptureUIMode.Video)

      If sfFile IsNot Nothing Then

         Dim fsFile As IRandomAccessStream = Await _
            sfFile.OpenAsync(FileAccessMode.Read)

         medVideo.SetSource(fsFile, "video/mp4")

      End If

   End Sub
Here, a CameraCaptureUI object is created and initialized. Its video format is set to MP4. It gets recorded with the help of CaptureFileAsync and then saved and displayed inside the MediaElement.
Using the MediaCapture Class to Capture Photos
The MediaCapture class provides functionality for capturing photos and videos from a device.
To take a photo with the MediaCapture class, use the following code:
   Private Async Sub btnMediaPhoto_Click(sender As Object, _
         e As RoutedEventArgs) Handles btnMediaPhoto.Click

      Dim medCapPhoto As New MediaCapture()

      Dim LocalPics = Await StorageLibrary.GetLibraryAsync _
         (KnownLibraryId.Pictures)

      Dim sfPhoto As StorageFile = Await _
         LocalPics.SaveFolder.CreateFileAsync("Pic.jpg", _
         CreationCollisionOption.GenerateUniqueName)

      Using sFileAccess = New InMemoryRandomAccessStream()

         Await medCapPhoto.CapturePhotoToStreamAsync _
            (ImageEncodingProperties.CreateJpeg(), sFileAccess)

         Using fsFile = Await sfPhoto.OpenAsync(FileAccessMode.ReadWrite)

            Dim bdDecoder = Await BitmapDecoder.CreateAsync(sFileAccess)
            Dim bdEncoder = Await BitmapEncoder. _
               CreateForTranscodingAsync(fsFile, bdDecoder)

            Dim bpPhotoProperties = New BitmapPropertySet() From {
               {
                  "System.Photo.Orientation", New _
                     BitmapTypedValue(PhotoOrientation.Normal, _
                     PropertyType.UInt16)
               }
            }
            Await bdEncoder.BitmapProperties. _
               SetPropertiesAsync(bpPhotoProperties)

            Await bdEncoder.FlushAsync()

         End Using

      End Using

   End Sub
This section is a tad more complicated, but the MediaCapture class is more powerful. It gives more control over how to create the file and how it should be sculpted. Add the last piece of code to record a video with the MediaCapture class:
   Private Async Sub btnMediaVideo_Click(sender As Object, _
         e As RoutedEventArgs) Handles btnMediaVideo.Click

      Dim medCapVideo As New MediaCapture()

      Dim medRecord As LowLagMediaRecording

      Dim LocalVids = Await StorageLibrary.GetLibraryAsync _
         (KnownLibraryId.Videos)

      Dim sfFile As StorageFile = Await LocalVids.SaveFolder. _
         CreateFileAsync("Vid.mp4", _
         CreationCollisionOption.GenerateUniqueName)

      medRecord = Await medCapVideo.PrepareLowLagRecordTo _
         StorageFileAsync(MediaEncodingProfile.CreateMp4 _
         (VideoEncodingQuality.Auto), sfFile)

      Await medRecord.StartAsync()

   End Sub
I get access to the device’s Video library to save the recording with the correct encoding in there.
Download the Code
Below this article, you will find a link to download the accompanying code files. Please feel free to use them in your project.
Conclusion
It is not too difficult setting up a UWP application inside Visual Studio. UWP provides numerous ways to work with images and video, which makes it easy to learn and play around with. Until next time, happy coding!


