Minimal APIs are HTTP based web APIs that can perform functions with minimal resources. Minimal APIs are a great option for applications that require limited files, fewer features, and the least dependencies.
In this programming tutorial, we will discuss the steps involved in creating a minimal API in .NET 5.0. Before seeing what it takes to build an API, let’s first look at the basic requirements for building our web application:
- .NET 5.0 SDK (Software Development Kit)
- Visual Studio or Visual Studio Code
- If you are using Visual Studio Code, then you need the C# Extension for Visual Studio Code.
For this project, we are going to create a simple minimal APIs for manipulating country data.
Are you looking to learn how to develop software in .NET in a classroom or online course environment? We have a list of some of the Best Online Courses to Learn .NET to help get you started.
How to Create a .NET API Project
To create a Web API project using .NET, developers need to open a command prompt in a folder where you want to create your project and run this command there:
dotnet new webapi -o WebApiDemo
Here, –o denotes the name of the output directory, which in our case is WebApiDemo; you can give any desired name to the project.
After the project is successfully created, the project template automatically creates a WeatherForecastController.cs file in the Controllers folder of the project, containing the boilerplate code that you need to get started with an API controller. We will come back to the controllers’ part, but for now, let’s get started with creating an entity class.
Creating an Entity Class in .NET
The entity class represents the data for our entity Country. For simplicity, I am using a minimal set of properties, including the Country’s Id and Name.
Create a new folder inside the Project directory with the name Entities. Then, create a new class named Country inside the Entities folder.
Add the two properties depicted below with the following code:
    public class Country
    {
        public int Id { get; set; }
        public string Name { get; set; }
    }
Create the Countries Controller
Inside the Controllers folder, create a new C# class and give it the name CountriesController.cs. Make sure that you put the Controller suffix in the name of the controller. Add the following code to the newly created controller class:
namespace WebApiDemo.Controllers
{
    [ApiController]
    [Route("[controller]")]
    public class CountriesController : ControllerBase
    {
        private List _countries = new List
        {
            new Country { Id = 1, Name = "USA" },
            new Country { Id = 2, Name = "Australia" },
 		  new Country { Id = 3, Name = "Denmark" }
        };

        [HttpGet]
        public IActionResult GetAll()
        {
            return Ok(_countries);
        }

        [HttpGet("{id}")]
        public IActionResult GetById(int id)
        {
            var country = _countries.Find(x => x.Id == id);
            if (country == null)
                return NotFound();
            return Ok(country);
        }
    }
}
Let’s understand, step-by-step, what we have done so far in this C# code. We have created a class, CountriesController, which is derived from a built-in .NET base class, ControllerBase. The ControllerBase class helps developers handle HTTP requests like Ok() and NotFound() using its predefined methods and properties.
Next, we used the ApiController attribute, which is placed just above the class definition:
    [ApiController]
    [Route("[controller]")]
    public class CountriesController : ControllerBase
    {
	…
         }
This attribute helps simplify the API development process by calling the corresponding action method based on parameter name and type (such as [FromBody], [FromQuery], etc.) and sending a bad HTTP response message back to the client in case the request is not processed successfully.
Next, we used the [Route(“Controller”)] attribute: [Route(“[controller]”)] .This attribute allows the controller name to be used as a base route for all the action methods.
Inside the CountriesController class, we used two methods – GetAll() and GetById(int) – to fetch the records conditionally. The former method returns a list of all products with a 200 OK HTTP status code. The [HttpGet] attribute is used here to make sure that it matches only HTTP GET requests. As you can see, there is no route template parameter defined there, so it matches the base path, (i.e. /countries.
Coming to the next method: GetById(int). This method will return a specified country based on the id value, and returns a response with Ok(). If there is no matching record found for that id, then it will return NotFound().
We also used another constraint attribute, which is [HttpGet(“{Id}”]. This attribute works the same way that [HttpGet] does; the only difference here is that the {id} gets automatically bound with the int id parameter of the GetById() method.
Read: Introduction to Web Components API
Starting the API
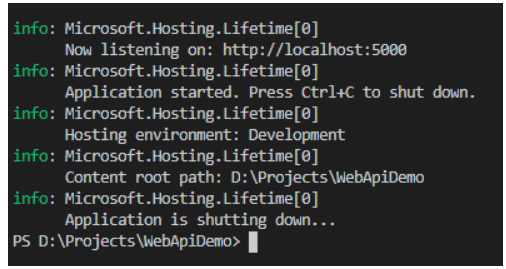
So far, we have set up our API with minimal resources. The next thing we must do is launch our API. To launch the API, we need to go to the project root folder, open the command line, and then run the following command:
dotnet run
Once the API gets running, you will be able to see a message on the command line something that looks some along the lines of this:
How to Test the Web API Using Postman
Now it is time to test our application. We will be using a tool called Postman. If you are not familiar with Postman – it is one of the preferred tools to test APIs by developers.
Fetching Entities from the API
The following steps allow us to fetch all country records from the API using Postman:
- Open the Postman app, and click on the Plus (+) icon at the end of the tab to create a new request tab.
- Select the GET method on the left side of the URL input field.
- In the URL field, paste the address of your local API followed by the countries route, such as: https://localhost:5001/countries.
- Click the Send button.
You will receive a response containing all the countries in a JSON array format.
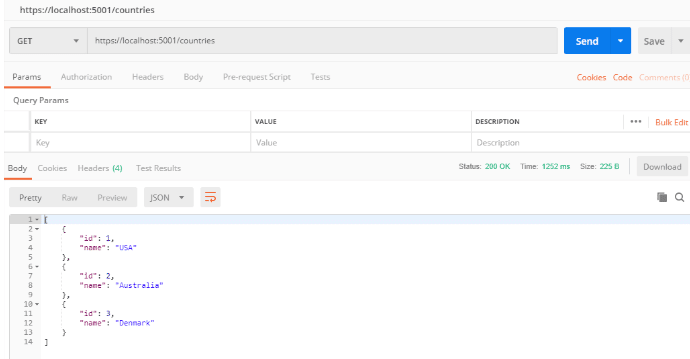
Screenshot depicting the request made to get all countries through Postman
Retrieving a Single Entity from an API in .NET
Developers can retrieve a specified product from the API using the Postman tool by following these steps:
- Open the Postman app, and click on the Plus (+) icon at the end of the tab to create a new Request tab.
- Select the GET method on the left side of the URL input field.
- In the URL field, paste the address of your local API followed by the countries details route, such as: https://localhost:5001/countries/2.
- Click the Send button
You will receive a response containing the details of a specified country in the JSON object.
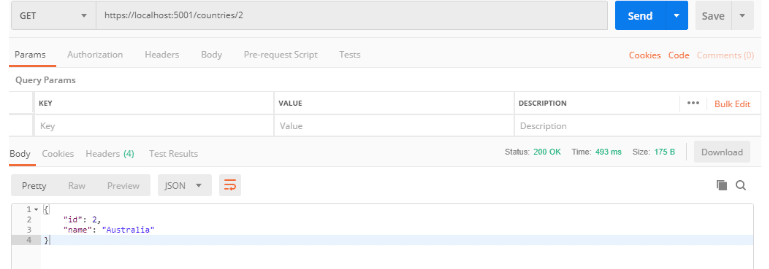
Screenshot depicting the request made to get a specified country through Postman.
Read more .NET programming tutorials and software development guides.