Dapper is a light-weight Object Relational Mapping (ORM) tool that helps .NET developers map databases directly to C# objects. Programmers can install Dapper using the NuGet package manager. In this article, I will explain Dapper’s ORM capabilities alongside example C# code to better demonstrate its usage.
How to Add Dapper Library to an ASP.NET Project
To begin, open Visual Studio and create a new ASP.NET Web Application, as shown here:

Enter the application/project name and select the .NET framework version:

Next, select both an Empty project template and an MVC</b type project:

Once you click Create, the following ASP.NET Sample Dapper project will be created. Note that I named mine MySampleDaper, so yours will appear a little different unless you named your project the same:

Read: Working with the Telerik ORM Tool
How to install the Dapper Library in a .Net Web Application
Next, we will add the Dapper library. Right click on the project and select the Manage NuGet Packages option:

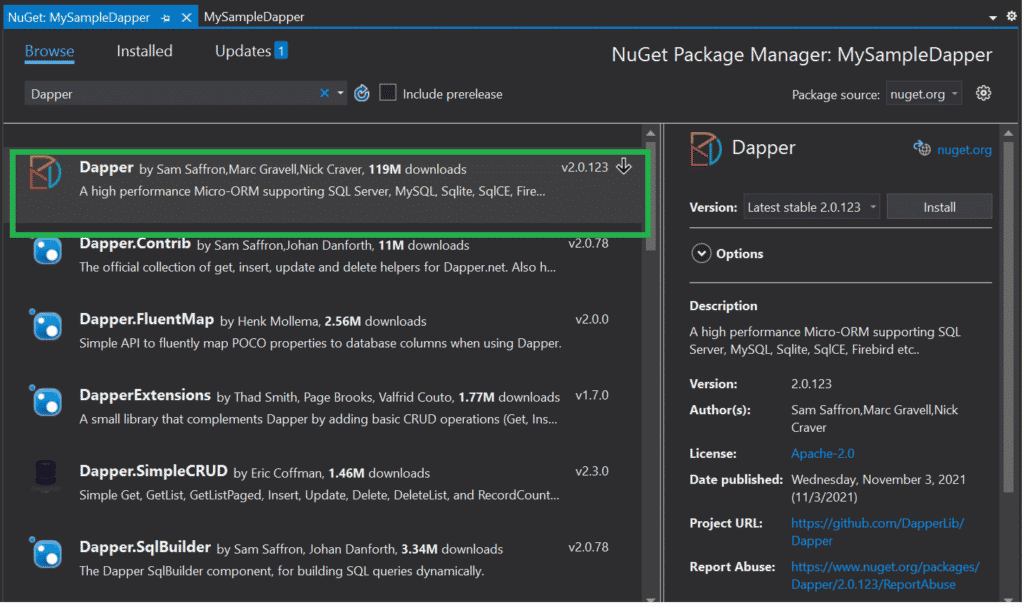
Search for ”Dapper” and select the first Dapper package and install it:

Here is an image showing the Dapper library added in the Project for reference:

Read: Best Relational Database Management Software (RDBMS)
Adding a Database to Our Project
Before we begin adding code to our project, we need to first create the database and table. First, let’s take a look at the table structure. I have added the following table called Student in the local SQL server and defined several data types:

Next, select Solution Explorer, right-click on Models, and add a new model class:

Refer to the following Student Model code snippet, which we will add in the Model folder:
Using System;
Using System.Collections.Generic;
Using System.Linq;
Using System.Web;

Namespace MySampleDapper.Models
{
    Public Class Student
    {
        Public int StudentId { Get; Set; }
        Public String StudentName { Get; Set; }
        Public String School { Get; Set; }
        Public String Class { Get; Set; }
    }
}
Next, we will need to add a Student Controller. To do so, right-click on the Controller folder and add a new controller class, as shown in the image below:

Choose the MVC 5 Controller template and click Add:

You will need to choose a name for the Controller – I went with StudentController. Once you enter the name, press the Add button.

Here is the C# code you will want to add to StudentController:
Using System;
Using System.Collections.Generic;
Using System.Linq;
Using System.Web;
Using System.Web.Mvc;

Namespace MySampleDapper.Controllers
{
    Public Class StudentController :   Controller
    {

        // GET Student
        Public ActionResult Index()
        {
            Return View();
        }

        // GET Student/Details/5
        Public ActionResult Details(int id)
        {
            Return View();
        }

        // GET Student/Create
        Public ActionResult Create()
        {
            Return View();
        }

        // POST Student/Create
        [HttpPost]
        Public ActionResult Create(FormCollection collection)
        {
            Try
            {
                // TODO: Add insert logic here

                Return RedirectToAction("Index");
            }
            Catch
            {
                Return View();
            }
        }

        // GET Student/Edit/5
        Public ActionResult Edit(int id)
        {
            Return View();
        }

        // POST Student/Edit/5
        [HttpPost]
        Public ActionResult Edit(int id, FormCollection collection)
        {
            Try
            {
                // TODO: Add update logic here

                Return RedirectToAction("Index");
            }
            Catch
            {
                Return View();
            }
        }

        // GET Student/Delete/5
        Public ActionResult Delete(int id)
        {
            Return View();
        }

        // POST Student/Delete/5
        [HttpPost]
        Public ActionResult Delete(int id, FormCollection collection)
        {
            Try
            {
                // TODO: Add delete logic here

                Return RedirectToAction("Index");
            }
            Catch
            {
                Return View();
            }
        }
    }
}
Getting a Database List Using Dapper ORM
Next, I have changed the ActionResult to get the list of Students using Dapper ORM:
// GET Student
        Public ActionResult Index()
        {
            List StudentList = New List();
            Using (IDbConnection db = New SqlConnection(ConfigurationManager.ConnectionStrings["studentConnection"].ConnectionString))
            {

                StudentList = db.Query("Select * From tblStudents").ToList();
            }
            Return View(StudentList);
        }
After that, we want to ad a new view, as demonstrated below:

For simplicity’s sake, name the view Index and click the Add button:

Here is the code snippet for the Index view:
@model IEnumerable<MySampleDapper.Models.Student>
    @{
    ViewBag.Title = "Index";
    }
    <h2>Index</h2>
    <p>
        @Html.ActionLink("Create New", "Create")
    </p>
    <table class="table">
        <tr>
            <th>
                @Html.DisplayNameFor(Model >= Model.StudentName)
            </th>
            <th>
                @Html.DisplayNameFor(Model >= Model.School)
            </th>
            <th>
                @Html.DisplayNameFor(Model >= Model.Class)
            </th>
            <th></th>
        </tr>
        @foreach (var item in Model) {
        <tr>
            <td>
                @Html.DisplayFor(modelItem >= item.StudentName)
            </td>
            <td>
                @Html.DisplayFor(modelItem >= item.School)
            </td>
            <td>
                @Html.DisplayFor(modelItem >= item.Class)
            </td>
            <td>
                @Html.ActionLink("Edit", "Edit", New { id=item.StudentID }) |
                @Html.ActionLink("Details", "Details", New { id=item.StudentID }) |
                @Html.ActionLink("Delete", "Delete", New { id=item.StudentID })
            </td>
        </tr>
        }
    </table>
Finally, you will want to change your RouteConfig.cs code to the following:
using System;
using System.Collections.Generic;
using System.Linq;
using System.Web;
using System.Web.Mvc;
using System.Web.Routing;

namespace MySampleDapper
{
    public class RouteConfig
    {
        public static void RegisterRoutes(RouteCollection routes)
        {
            routes.IgnoreRoute("{resource}.axd/{*pathInfo}");

            routes.MapRoute(
                name: "Default",
                url: "{controller}/{action}/{id}",
                defaults: new { controller = "Student", action = "Index", id = UrlParameter.Optional }
            );
        }
    }
}
Run the Project to view the Index view created in the above step.
Conclusion to Installing and Configuring Dapper ORM
I hope you enjoyed our tutorial explaining how to install and configure Dapper ORM to use with .NET MVC applications. That’s all for today. Happy reading!
Read more C# programming tutorials.


