This .NET programming tutorial covers error handling and exceptions in C#. Learn about thrown exceptions, common C# error-handling techniques, and the try-catch block.
What are Exceptions?
Exceptions in C# are a type of error that occurs during the execution of a program. When an exception occurs in any program, it is said to be thrown. This “thrown” exception is an object which is derived from the System.Exception class. The System.Exception class holds different properties and methods that give details about the errors encountered in your program. In the later part of this article, we will discuss and see how the exceptions in C# are handled with try-catch blocks and where it is preferred to use finally.
Read: C++ Exception Handling
Exception Classes in C#
All the exception classes in C# are derived from the System.Exception class – directly or indirectly. The following list gives you a brief look at some of the common exception classes present in C#:
- System.IO.IOException: Handles the I/O related errors.
- System.IndexOutOfRangeException: Handles the errors of accessing an array element, which is out of bound.
- System.NullReferenceException: Handles the errors generated during dereferencing a null object.
- System.DivideByZeroException: Handles the errors generated while dividing any integer number with zero.
- System.InvalidCastException: Handles the errors generated during typecasting.
- System.OutOfMemoryException: Handles the errors related to memory allocation.
Exception Handling in C#
Below are some methods developers can use to handle exceptions in C#.
Implementing the try-catch Block
In C#, you can handle an exception in the program using the exception handlers. In exception handling, the program is divided into blocks of code. The piece of code which shows some probability of raising an error is placed inside the block and this block contains one – or more than one – exception handler. These handlers solve the exceptions that are either application level or system level.
The following code snippet shows how an exception raises in a C# program:
class Example
{
    public void Division ( int num1, int num2 )
    {
        int r = num1/num2;
        Console.Write(rem);
    }

    public static void Main ( string[ ] args )
    {
        Division ( 7, 0 );
        Console.ReadLine();
    }
}
The above code throws a ‘DivideByZeroException’ exception. This type of exception occurs when you try to divide any number by zero. So, in our case, in the above example, a runtime error will occur when the divide statement is executed. But, as we have not defined any exception handler here for this kind of exception, the default exception handler will be invoked. Through the default exception handler, the developer will be given some hints about the error by displaying the error messages so that he will be able to troubleshoot the problem.
C# follows a structure to handle errors using the try and catch block. This structure enables the programmer to differentiate the code of the program from the code of exception handling.
Exception handler mechanisms can be implemented by using the following keywords:
- try Block
- catch Block
- finally Block
Read: Best Exception Handling Techniques in .NET
try Block
The statements which have a probability of raising error at runtime are put into the try block. Note that, when you implement a try block, it becomes necessary to implement a catch block too. A try block looks like the following in C#:
try{
// statements that can throw exception
}
catch Block/h3>
The exception generated in the try block is caught by the catch block. The catch block is defined immediately after the try block. It has the following syntax:
   try
   {
        //statements that may cause an exception
   }
   catch ( … )
   {
        //error handling code
   }
The following C# code example demonstrate how to use the try catch block in a program:
    class Program
    {
        public static void Main(string[] args)
        {
            int[] arr = { 10, 20, 30, 40, 50 };

            for (int i = 0; i < arr.Length; i++)
            {
                Console.WriteLine(arr[i]);
            }

            try
            {
                // Try block to access invalid index of array
                Console.WriteLine(arr[5]);

            }
            catch (IndexOutOfRangeException e)
            {
                // Displaying the type of exception.
                Console.WriteLine("Exception occurred : {0}", e.Message);
            }
        }
    }
By executing the above code, you will get the following output:

Read: Debugging Tools for C#
Using Multiple try-catch Blocks with finally Block
In the previous section, we have implemented a try-catch block where we placed the code which is more likely prone to errors in a try block, and then “catch” the exception if it occurred in a catch block.
However, here, using multiple catch blocks, the exceptions generated in the try block are caught by one of the multiple catch blocks. It is recommended to use multiple catch blocks in the scenario when we do not know in advance the type of exception that may be generated. So, we write different types of blocks to catch the specific exception(s).
The finally block is a part of code that is executed irrespective of whether an exception has occurred or not. The actions, such as closing the database connection or closing the file stream, are placed inside the finally block. Here is an example of the finally syntax in C#:
try
{
  // statements that may raise exception
}
catch(Exception_type1 obj)
{
  // handler code
}
catch(Exception_type2 obj)
{
  // handler code
}
.
.
finally
{
  // code you want to run irrespective of an exception is occurred or not
}
The catch block is used to handle the specific type of exception thrown. The finally block guarantees to execute the statements written in its enclosed brackets whether an exception occurs or not. There must be only one finally block for each try block. After all, it is not mandatory to create a finally block followed by the try block.
The following C# code snippet depicts both things: use of multiple catch blocks, as well as, the finally block:
    class Example
    {
        public static void Main(string[] args)
        {

            int[] arr = { 40, 50, 0, 60, 70, 80, 90 };

            try
            {
                // Try block to generate an exception
                for (int i = 0; i < arr.Length; i++)
                {
                    Console.WriteLine(arr[i] / arr[i + 1]);
                }
            }

            // Catch block to catch the divide by zero exception
            catch (DivideByZeroException ex)
            {
                Console.WriteLine("Exception occurred : {0}", ex.Message;
            }

            // Catch block for accessing invalid index of array
            catch (IndexOutOfRangeException ex)
            {
                Console.WriteLine("Exception occurred : {0}", ex.Message);
            }

            // Catch block for value being out of range
            catch (ArgumentOutOfRangeException ex)
            {

                Console.WriteLine("Exception occurred : {0}", ex.Message);
            }

            // Finally block
            finally
            {
                for (int i = 0; i < arr.Length; i++)
                {
                    Console.Write(" {0}", arr[i]);
                }
            }
        }
    }
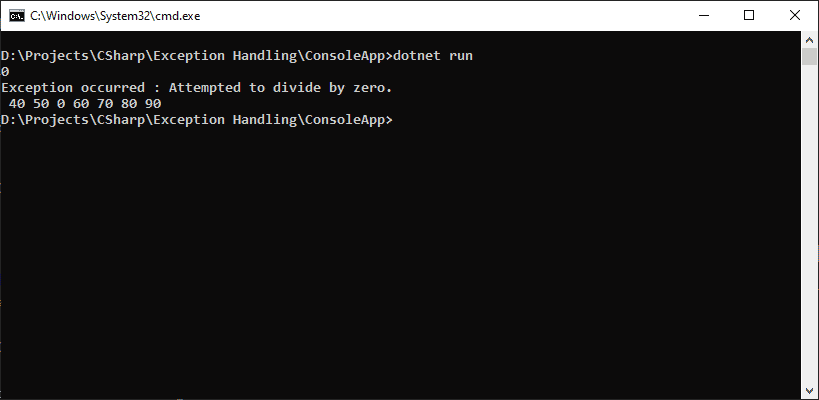
The output of the above code is as follows:

Note that the code in the finally block is executed irrespective of if the exception has occurred or not.
What Are User-defined Exceptions in C#?
.NET programmers can also define their exceptions in C#. Sometimes, developers want to catch the exception and handle it with their code. So, these exceptions are known as user-defined exceptions. Recall that, while creating the user-defined exceptions, the base class of all exceptions in C# will be the ‘System.Exception’ class.
How Do You Create a User-defined Exception in C#?
In the following example, we have implemented a user-defined exception. For implementing such a type of exception, we first need to raise an exception. After raising the exception, we need to throw an object of the user-defined exception. Consider the following C# code example to get a more clear idea:
    class DivideByZero : Exception
    {
        public DivideByZero()
        {
            Console.Write("Exception occurred!");
        }
    }

    class Demo
    {
        public double DivisionOperation(double numerator,
                                     double denominator)
        {
            // throw exception when the value of denominator equals to 0
            if (denominator == 0)
                throw new DivideByZero();
            // Otherwise return the result of the division
            return numerator / denominator;
        }

        public static void Main(string[] args)
        {
            Demo obj = new Demo();
            double num = 10, den = 0, quot;
            try
            {
                quot = obj.DivisionOperation(num, den);
                Console.WriteLine("Quotient = {0}", quot);
            }
            catch (Exception ex)
            {
                Console.Write(ex.Message);
            }
        }
    }
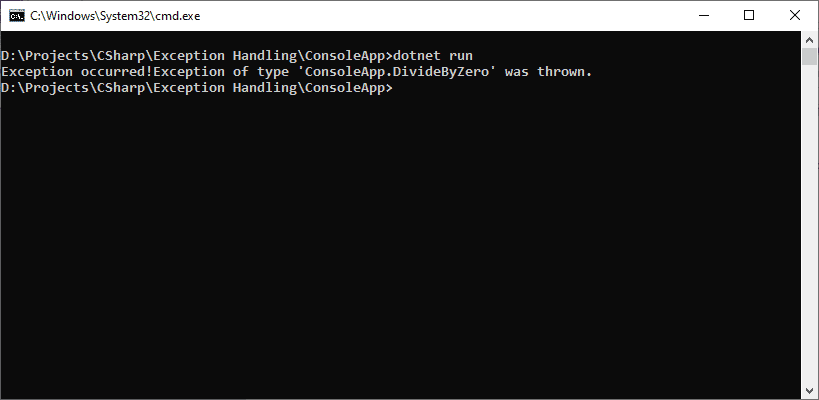
Running this code in your code editor or integrated development environment would result in the following output:

Raising an Exception
Continuing with the above code example, we have used the throw keyword to raise an exception as shown in the following code:
            if (denominator == 0)
                throw new DivideByZero();
            return numerator / denominator;
In this code, throw is used to raise a user-defined exception DivideByZero. If the value of the denominator is found to be 0 while doing the division operation, the application raises the DivideByZero exception. It will let the programmer know that the denominator value he has passed is zero in the DivisionOperation() method.
Throwing Exception Objects
Users can throw an object of an exception by using the throw keyword. Recall that the object of the exception should be derived from the ‘System.Exception’ class.
In the following C# code example, we have demonstrated how you can use throw to throw an object of the current exception:
catch(Exception exceptionObj)
{
   throw exceptionObj
}
Conclusion of C# Exception Handling Tutorial
If the exceptions in your program are not handled properly then they may cause serious issues in your application. If you do not put the piece of code that you think may raise an exception in the future inside the try-catch block, then your program may abort abnormally and it will be hard enough for you or any developer to trace the error back to the source code and fix it. Hence it is highly recommended to implement exception handling in your program.


