If you’ve been using Microsoft’s Azure services for some time now, you’ll be aware that the management portal has been through some major changes over recent years. From what I understand, it’s currently the largest single page application, and is quite a lot to take in for new users.
The reason behind this article is I’ve often come across situations where I’m away from my desk and a client calls up and needs me to do something with one of possibly many app services. Given this is increasingly common, I went and built myself a mobile app with which I can do just that. In this article, we’ll look at making a RESTful call from a UWP app to the Azure management API, the same API the portal uses, to start and stop an app service.
Before we start however, we need one thing; we need to be able to authenticate and gain access to the management API. There are a few steps required, and the route I chose was to authenticate using the oauth2 work flow.
The first step is creating an Azure app, which we’ll use to authenticate with through Azure Active Directory.
If you don’t have an Azure subscription, fear not; you can set one up using the free trial Microsoft offer. This can be found here, and comes with a generous helping of credit to try things out with.
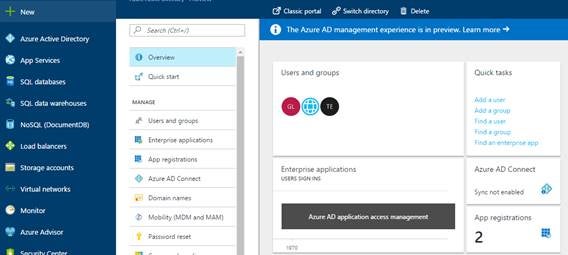
If you’ve set your subscription up, or have one already, you’re ready to go. From the portal, open up the Azure Active Directory menu as shown in Figure 1.
Figure 1: Azure portal after Azure Active Directory has been selected
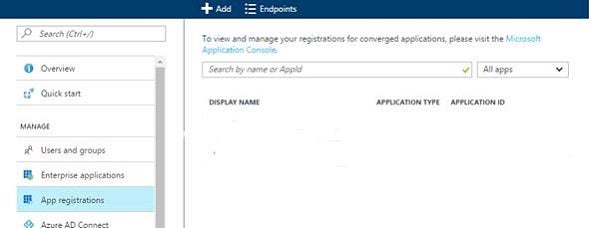
In Figure 1, Azure Active Directory is at the top of the list to the left, if you can’t see it anywhere. Click more services at the bottom of this list, which allows you to search for it. Once you’ve done that, select App registrations from the sub menu on the left.
Figure 2: App registrations selected
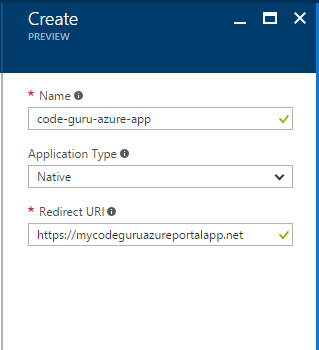
Once you see something like we we’re looking at on Figure 2, click add from the top. You’ll see something like what we’re seeing in Figure 3. I’ve entered the name ‘code-guru-azure-app’, and provided a redirect URL, which reads ‘https://mycodeguruazureportalapp.net’. The redirect URL does not need to be a real address for this example, just a valid URL. And finally, the application type in this case will be a Native application.
Figure 3: Registering a new app
Click create, select your newly created app from the list of registered apps, and then open up all settings.
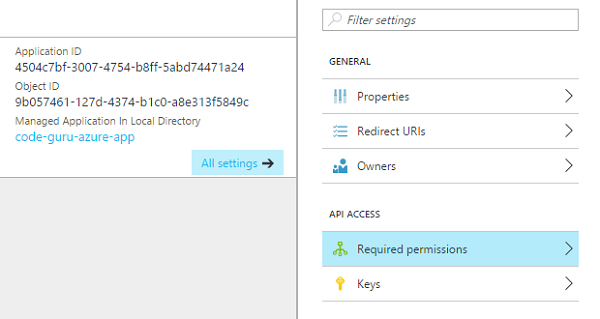
Figure 4: Showing all settings from the details of our registered app
You’ll need to open up the required permissions; but just before you do that, make a note of the Application ID, which is shown at the top of Figure 4 on the left. This App ID will be used in our UWP app, and is essential for authentication.
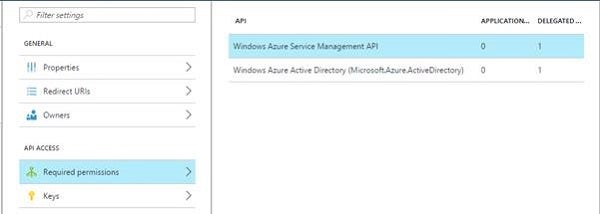
Once you’ve opened up the Required permissions, which is shown in Figure 5…
Figure 5: Showing required permissions
For a newly created app, you’ll most likely not have Windows Azure Service Management API in your list of required permissions. From the add button at the top of the list of permissions, add Windows Azure Service Management API. This is done in two steps; first, you select the API which we just named, and secondly you specify the required permissions. At the time of writing, this API only has one permission, Access Azure Service Management as organization users. Tick this permission, click select, then done. Figure 6 is an example of what you might see when following this process…
Figure 6: Selecting the permission for the chosen API in step 1
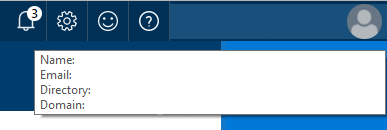
At this point, your app registration is complete; however, you’ll need one more piece of information. And that piece of information is your tenant name. In the top left of the Azure portal, hover over the profile section, and you’ll see something like this.
Figure 7: Information popup
From the popup, whatever is specified after the domain label at the bottom, you may use as your tenant name. It could be something like, yourname.onmicrosoft.com. Make a note of whatever this is; we’ll need this along with the application ID in our UWP app.
And with that aside, let’s now turn our attention to our UWP app.
The UWP App
I’m going to put this app together without using any of the various packages available on NuGet, and make calls to the API using HttpClient. So, how do we know what end points to call? The answer to this is pretty cool, and it comes in the form of the Azure Resource Explorer.
From the Resource Explorer, we’ll find what we need to stop and start a particular app service, which in our case will be a simple, free Web site. However, before we can do that, our app needs to authenticate with Azure Active Directory. Let’s look at the code to do this.
From an empty UWP application, the XAML in the MainPage.xaml looks something like this…
<Grid Background="{ThemeResource
   ApplicationPageBackgroundThemeBrush}">

   <StackPanel x_Name="buttonsLayout"
               HorizontalAlignment="Center"
               VerticalAlignment="Center">

      <Button Click="StartClicked">Start</Button>
      <Button Click="StopClicked">Stop</Button>

   </StackPanel>

   <WebView x_Name="webView"
            Visibility="Visible">

   </WebView>

</Grid>
We have two buttons, which we’ll use to stop and start a Web app, and a WebView that will only be visible for the sign-in process. Let’s look at the code for the Web view first because there’s quite a bit needed to get things going.
public MainPage()
{
   this.InitializeComponent();
   this.Loaded += MainPage_Loaded;
}

private void MainPage_Loaded(object sender, RoutedEventArgs e)
{
   webView.NavigationStarting += async (s, args) =>
   {
      if (args.Uri == null ||
         !args.Uri.ToString().StartsWith
            ("https://mycodeguruazureportalapp.net"))
         return;

      webView.Stop();
      webView.Visibility = Visibility.Collapsed;

      string code = args.Uri.Query.Replace
         ("?code=", "");

      _tokenResponse = await AuthenticateAsync(code);
   };

   Login();
}

async Task<TokenResponse> AuthenticateAsync(string code)
{
   using (var httpClient = new HttpClient())
   {
      using (var content = new StringContent
         ($"grant_type=authorization_code&client_id={ CLIENT_ID }&
         redirect_url=https://mycodeguruazureportalapp.net/&
         code={ code }& resource=https://management.core.windows.net/",
         Encoding.UTF8, "application/x-www-form-urlencoded"))
      {
         var result = await httpClient.PostAsync
            ($"https://login.microsoftonline.com/{ TENANT_ID }/oauth2/
            token", content);

         var tokenResponse =
            JsonConvert.DeserializeObject<TokenResponse>
               (await result.Content.ReadAsStringAsync());

            return tokenResponse;
      }
   }
}
In the preceding code, once the page has loaded and we know all elements will be available, we are subscribing to the NavigationStarting event on the WebView and catching the request when the URL is set to what we specified in our Redirect Url when registering the app in the Azure Portal. When we catch this redirect, you’ll find that the code to get an access token will be added to the URL with the query value code. Note that the redirect URL specified in the body of the post when authenticated must match the redirect URL given when registering the app.
Once we’ve authenticated, I’m using Newtonsoft.Json to parse the result into a type TokenResponse, which looks something like this…
class TokenResponse
{
   public string Access_Token { get; set; }
   public string Token_Type { get; set; }
   public string Expries_In { get; set; }
   public string Expires_On { get; set; }
   public string Resource { get; set; }
   public string Refresh_Token { get; set; }
   public string Id_Token { get; set; }
}
And now, let’s navigate the WebView to the sign-in URL, which looks something like this…
void Login()
{
   webView.Navigate(new Uri($"https://login.microsoftonline.com/{ TENANT_ID }/
      oauth2/authorize?client_id={ CLIENT_ID }&redirect_url=urn:ietf:wg:oauth:
      2.0:oobo&response_type=code&prompt=consent&response_mode=query"));
}
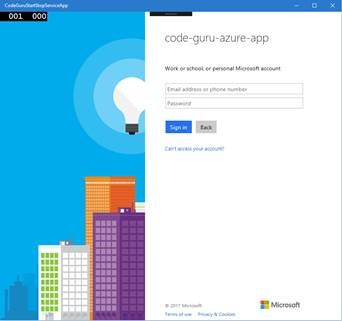
There are a number of parts to the URL, and in your good time I’ll let you study them. For now, at the time of writing, this will be enough to start the sign-in process. And if we run the app, we end up with a view that looks like Figure 8.
Figure 8: The started sign-in process
Sign in, give consent when asked, and the event handler we set up to catch the redirect should give us the access token we need to move on to the next part—starting and stopping a Web app.
Starting and Stopping a Web App
For this section of the article, we’ll be using Azure Resource Explorer to find a Web app we have running. Also, we’ll get the URL of the call needed to stop and start it.
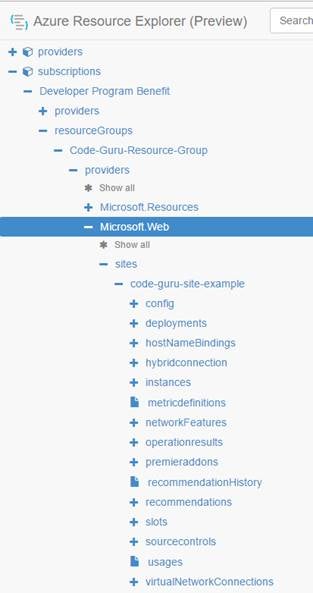
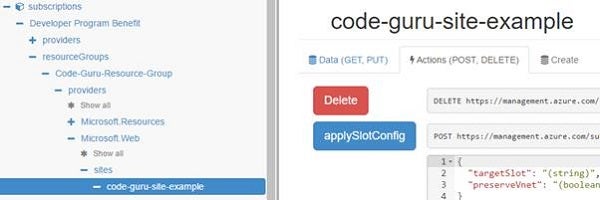
From the explorer, we can list any sites we have set up by using the navigation tree on the left. Mine looks like what we are seeing in Figure 9.
Figure 9: Using the resource explorer to view the sites associated with a resource group
If we select the site from the tree, and then click the Actions tab, we’ll see a list of actions. We’ll also see the URL needed to execute that action.
Figure 10: The selected site, with the Actions tab open
At the bottom of the list of actions shown, you’ll find the two actions that are of interest to us for the needs of this article; these are ‘start’ and ‘stop’.
Figure 11: The actions ‘start’ and ‘stop’
Remember the two buttons we set up in our XAML on the MainPage? Let’s look at the code for their event handlers…
private async void StartClicked(object sender, RoutedEventArgs e)
{
   await PostAsync("Your start Url", _tokenResponse);
}

private async void StopClicked(object sender, RoutedEventArgs e)
{
   await PostAsync("Your stop Url", _tokenResponse);
}

async Task PostAsync(string url, TokenResponse tokenResponse)
{
   using (var httpClient = new HttpClient())
   {
      httpClient.BaseAddress = new
         Uri("https://management.azure.com/");
      httpClient.DefaultRequestHeaders.Clear();
      httpClient.DefaultRequestHeaders.Authorization =
         new System.Net.Http.Headers.AuthenticationHeaderValue
         (tokenResponse.Token_Type, tokenResponse.Access_Token);

      await httpClient.PostAsync(url, null);
   }
}
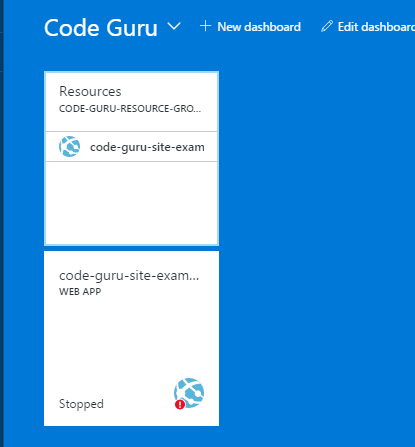
Through the Azure portal, I’ve pinned my Web app to the dashboard, which at the moment looks like this…
Figure 12: The pinned resource group and web app in the ‘stopped’ state
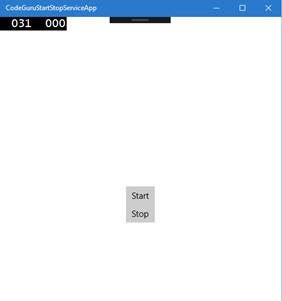
Let’s start the app, sign in, and click the start button we created.
Figure 13: The app after sign in, showing the start and stop buttons
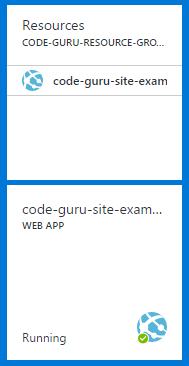
Figure 14: The app running after pressing the ‘start’ button
| Note: To see the change, you’ll have to refresh your browser. |
Conclusion
There we have it, a simple app that can authenticate with Azure Active Directory; it requires us to register our app. Once authenticated, we have received an access token which in turn allows us to read data from the Azure Management API and execute actions. When you have the time, I would recommend spending some time with the Resource Explorer, and have fun adding even more functionality to the app.
If you have any questions related to this article, you may find me hovering around on Twitter @GLanata.


