If you’re new to .NET Core, and familiar with the full .NET Framework, you may or may not have noticed that the System.Drawing namespace—which is very useful for image processing and manipulation—is not available to .NET Core. Because the full framework runs on Windows machines, .NET Core is cross platform; and to quote MSDN ‘The System.Drawing namespace provides access to GDI+ basic graphics functionality.’ We begin to see the problem here.
There is a good chance .NET Core will not be running on Windows, so we need to consider alternatives when looking to process images with .NET Core.
For this article, we’ll look at one such project, named ImageSharp, which has reached the alpha stage. You can find the project here.
This project has seen some outstanding progress from the team, and I’m sure they’ll be grateful for any help you may be able to provide in seeing this project to release. However, because this project is currently in alpha, it isn’t for use in production environments just yet.
All that aside, let’s look at using ImageSharp to do some simple image processing. I’m going to download and compile the project manually, and then include the projects needed in a new solution along with a .NET Core console application.
To clone the ImageSharp project; you may use this link…
git clone https://github.com/JimBobSquarePants/ImageSharp
Once cloned and opened, you should have an ImageSharp solution that looks like what we see in Figure 1.
Figure 1: The ImageSharp solution
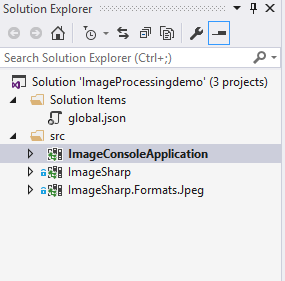
Following this, we’ll then create another solution that we’ll use for the remainder of this article. This solution setup looks like this…
Figure 2: Our example solution including ImageSharp with a console application
From your console application, reference the other two projects. Note that, to process an image of a particular format, you’ll need to include the relevant project, too. From Figure 2, observe that the ImageSharp.Formats.Jpeg project has been included, along with ImageSharp.
Given the format project included, we’ll be processing JPEG images for this article. To begin, we’ll create an empty image.
At a location of your choosing, let’s create a directory to hold our images. If you prefer, you can simply store these at the root of your application. I’ve created a directory on one of my flash drives, called ‘ImageSharpExampleImages’, and put together some code that looks similar to this…
public static void Main(string[] args)
{
   CreateImage();
}

static void CreateImage()
{
   var directory = Path.GetDirectoryName("G:\\
      ImageSharpExampleImages'\\");
   var imageName = "codeguruimage.jpg";

   using (FileStream fileStream = File.OpenWrite
      (Path.Combine(directory, imageName)))
   {
      Image newImage = new Image(400, 400);
      newImage.SaveAsJpeg(fileStream);
   }
}
If you run the console application, executing the preceding code, you should find a JPEG in your designated directory. This image should be 400 by 400 pixels and all black because we haven’t specified any colors yet.
A black image isn’t very interesting, so let’s add some color to it. ImageSharp allows you to extract the image’s pixels, and presents them in a very handy struct named Color. This value type allows us to take a pixel and do a number of operations on it, such as returning a hex string and much more. If you have the time, I would suggest studying Color, but for now, let’s create a bitmap with some added color.
With the following code, we’ll turn our image to all red.
using (FileStream fileStream =
   File.OpenWrite(Path.Combine(directory, imageName)))
{
   Image newImage = new Image(400, 400);

   Color[] pixels = newImage.Pixels;

   for(int i = 0; i < pixels.Length; i++)
   {
      pixels[i].R = 0xff;
   }

   newImage.SetPixels(400, 400, pixels);
   newImage.SaveAsJpeg(fileStream);
}
And the output from the code above…
Figure 3: The image with pixels manipulated to coloured red
From that simple action above, we can also see how to do something like extracting the pixels from one image, and placing them on another image in a given position. I’ll leave that piece of fun for you to explorer in your good time, and move in to looking at some other processing options available to us.
If you’re following along with the code, go ahead and include the ImageSharp.Processing project in your solution and add a reference to it. If all is well, you’ll find that this Processing project gives us actions such as:
Resizing our image:
newImage.Resize(600, 600);
Changing saturation levels:
newImage.Saturation(-50);
Rotating the hue:
newImage.Hue(180);
We also have included, out of the box, some of the good old classic effects like Oil Painting, Gaussian blur/sharpen, and converting the image to Greyscale.
I’ll leave this here with your good self, and happy image processing to you and a round of applause for the team behind ImageSharp. If you have any questions about this article, you may find me on Twitter @GLanata.


