Introduction
Web sites often use menus
to display available options to the end user. The data required by these menus,
such as menu text and URL, is frequently stored in XML files. Though this
arrangement works great for small number of menu items, in certain applications
it is required that you display menu options based on the security credentials
of the current user. At times you may also need to display menus in Unicode character set.
In such cases storing menu data in a database table can be more beneficial than
maintaining separate XML files. In this article you will develop an Accordion
menu that fetches data such as menu text, menu items and URL from a database
table. An Accordion menu essentially displays menu options in collapsible
panels. At a time only one menu and its options are expanded while other menus
are collapsed. In order to develop our Accordion menu we will make use of ASP.NET, Windows
Communication Foundation (WCF)
and jQuery.
Accordion in Action
Before going to the actual
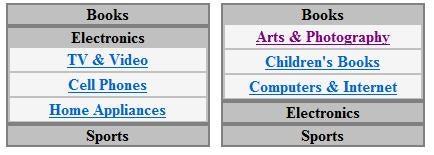
development, let’s see how our Accordion menu will look. Figure 1 shows our
Accordion menu with three menus viz. Books, Electronics and Sports. Each of
these menus have certain menu items. At a time only one of the menus will be
fully expanded. For example, if you click on Books menu, it will expand to
reveal its menu items and the previously expanded menu (if any) will be
collapsed.

Figure 1: Accordion Menu
Creating Database Tables
To begin with, create a
new website in Visual Studio and add a SQL Server Database to its
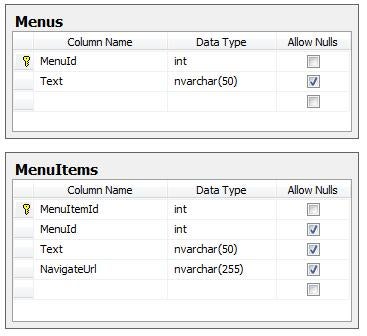
App_Data folder. Design two tables namely Menus and MenuItems. The schema of
Menus and MenuItems tables is shown in Figure 2.

Figure 2: Schema of the Menus and MenuItems tables
The Menus table has two
columns viz. MenuId and Text. The MenuId is an identity column and indicates a
unique ID for a menu. The Text column indicates the menu text to be displayed
on the web form. The MenuItems table consists of four columns. One menu can
have multiple menu items. The menu ID and menu item ID are stored in MenuId and
MenuItemId columns respectively. The Text and NavigateUrl columns represent
menu item text and a URL where the user will be taken upon clicking on the menu
item respectively.
Once you create the tables
as shown above add some sample data for testing purpose.
Creating a WCF Service
To get the data out of
these tables you will use LINQ
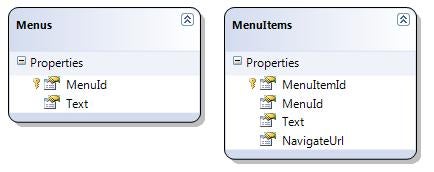
to SQL. So add LINQ to SQL classes (.dbml) file to the website. From the
server explorer, drag and drop Menus and MenuItems table onto the surface of
the dbml file so as to create the required LINQ to SQL Classes (Figure
3).

Figure 3: Drag and drop Menus and MenuItems table onto the surface of the dbml file
Next, add a new Windows
Communication Foundation (WCF)
Service to the website. Adding a WCF service in Visual Studio
creates a class for the service and an interface that acts as a service
contract. The service class implements the service contract interface. The
complete code of the service contract interface in shown below.
[ServiceContract]
public interface IService
{
    [OperationContract]
    [WebInvoke(Method = "POST",
     RequestFormat = WebMessageFormat.Json,
     ResponseFormat = WebMessageFormat.Json)]
    Menu[] GetMenus();

    [OperationContract]
    [WebInvoke(Method = "POST",
     RequestFormat = WebMessageFormat.Json,
     ResponseFormat = WebMessageFormat.Json,
     BodyStyle=WebMessageBodyStyle.WrappedRequest)]
    MenuItem[] GetMenuItems(int menuId);
}
As you can see, the
IService interface is decorated with the [ServiceContract] attribute indicating
that it is a WCF service contract. The IService interface contains two
methods GetMenus() and GetMenuItems(). The former method returns an array of
Menu objects whereas the later returns an array of MenuItem objects belonging
to a menu. The Menu and MenuItem class represent a menu and a menu item
respectively and are simple classes as shown below:
[DataContract]
public class Menu
{
    [DataMember]
    public int MenuId { get; set; }
    [DataMember]
    public string Text { get; set; }
}

[DataContract]
public class MenuItem
{
    [DataMember]
    public int MenuId { get; set; }
    [DataMember]
    public int MenuItemId { get; set; }
    [DataMember]
    public string Text { get; set; }
    [DataMember]
    public string NavigateUrl { get; set; }
}
The Menu and MenuItem
classes are marked with the [DataContract] attribute indicating that they are WCF
data contracts and can be passed to and from the WCF service. Individual
members of Menu and MenuItem classes are marked with [DataMember] attribute
indicating that the member is serializable.
Notice that the methods of
the IService interface are marked with [OperationContract] and [WebInvoke]
attributes. The former attribute indicates that the method is a WCF
operation and the later indicates that the method can be invoked using the REST
programming model. Notice properties of [WebInvoke] attribute class carefully.
The Method property specifies the HTTP method (GET or POST) used to call this
operation. RequestFormat and ResponseFormat properties specify the format of
data between the service and the client. Possible values are JSON and XML.
The Service class
implements IService interface. The complete code of Service class is shown
below:
public class Service:IService
{
    public Menu[] GetMenus()
    {
        DataClassesDataContext db = new DataClassesDataContext();
        List<Menu> menus = new List<Menu>();
        var temp = from item in db.Menus
                   select item;
        foreach (var obj in temp)
        {
            Menu m = new Menu();
            m.MenuId = obj.MenuId;
            m.Text = obj.Text;
            menus.Add(m);
        }
        return menus.ToArray();
    }

    public MenuItem[] GetMenuItems(int menuId)
    {
        DataClassesDataContext db = new DataClassesDataContext();
        List<MenuItem> items = new List<MenuItem>();
        var temp = from item in db.MenuItems
                   where item.MenuId == menuId
                   select item;
        foreach (var obj in temp)
        {
            MenuItem mi = new MenuItem();
            mi.MenuId = (int)obj.MenuId;
            mi.MenuItemId = obj.MenuItemId;
            mi.Text = obj.Text;
            mi.NavigateUrl = obj.NavigateUrl;
            items.Add(mi);
        }
        return items.ToArray();
    }
}
The GetMenus() method
selects all the records from the Menu table using a LINQ query and fills
them into a generic list of Menu objects. It then converts the List into an
array using ToArray() method. The GetMenuItems() accepts an integer parameter
menuId that represents a menu ID whose menu items are to be retrieved. It then
uses a LINQ query to fetch relevant records from MenuItems table. A
generic list of MenuItem objects is created by iterating through the fetched
rows. Finally, the List is converted into an array using ToArray() method.
jQuery Code
Now create a Scripts
folder in the website and copy the jQuery files there (or you can also
use CDN to refer jQuery files). Open the default web form and add a
<script> tag pointing to the jQuery library.
<script src="Scripts/jquery-1.4.3.js" type="text/javascript"></script>
Then add two CSS classes
viz. Menu and MenuItem in the head section of default.aspx as shown below:
<style type="text/css">
    .Menu
    {
        width:200px;
        text-align:center;
        border:solid 2px gray;
        padding:0px;
        background-color:Silver;
        cursor:hand;
        font-weight:bold;
    }

    .MenuItem
    {
        width:192px;
        text-align:center;
        border:solid 1px silver;
        padding:2px;
        background-color:whitesmoke;
    }

</style>
The menus and menu items
will consist of <DIV> elements and the respective CSS classes will be
applied to them for the sake of look and feel.
Place a <DIV>
element inside the <body> tag as shown below and specify its ID as
accordionContainer.
<div id="accordionContainer"></div>
This <DIV> acts as a
container to the accordion menus and menu items.
Now add a <script>
block in the head section and handle ready event of jQuery as shown below:
$(document).ready(function() {
    $.ajax(
    {
        type: "POST",
        url: "Service.svc/GetMenus",
        contentType: "application/json; charset=utf-8",
        dataType: "json",
        success: CreateMenus,
        error: function(err) {
            alert(err.status + " - " + err.statusText);
        }
    }
    );
});
The ready event is raised
when the complete DOM of the web page is loaded in the browser. In the ready
event handler you need to call GetMethods() method of the WCF service to
retrieve the menu data. The $.ajax() method of jQuery allows you to call WCF
services. Notice the various configuration parameters passed as a part of
$.ajax() method call. The type parameter indicates the HTTP method to invoke
the WCF service (POST in this case). The url parameter points to the REST
endpoint of the WCF service. The general syntax for the url parameter is
<wcf_service_svc_file/method_name>. The contentType parameter indicates
the content type of the request. The dataType parameter indicates the data type
of the response. Recollect that we have specified it to be JSON in the [WebInvoke]
attribute. The success parameter indicates a function that will be called when
the call is successful. The error parameter indicates a function that will be
called if there is any error while calling the remote method.
The CreateMenus() function
mentioned in the success parameter above looks like this:
function CreateMenus(results) {
 for (var i = 0; i < results.length; i++) {
  $("<div class='Menu'>" + results[i].Text + "</div>")
     .click({ MenuId: results[i].MenuId }, OnMenuClick)
     .appendTo("#accordionContainer");
 }
}
The CreateMenus() function
receives a parameter that is nothing but the return value of the WCF service
method (GetMenus in this case) that was called. Recollect that GetMenus()
method returns an array of Menu objects. The CreateMenus() method then iterates
through the Menu array. With each iteration a new <DIV> element is formed
wrapping the Text of the menu. The code also attaches click event handler
(OnMenuClick) for the newly created <DIV>. Notice how the menu ID is
passed to the click event handler. The newly created <DIV> is then
appended to the accordion container <DIV> element using appendTo() method
of jQuery.
When a user clicks on any
of the menu <DIV> elements OnMouseClick function will be called. The
complete code of OnMouseClick function is as follows:
function OnMenuClick(event) {
    $("div[id ^= 'menuItemGroup']").slideUp(500);
    $.ajax(
        {
            type: "POST",
            url: "Service.svc/GetMenuItems",
            data: '{"menuId":"' + event.data.MenuId + '"}',
            contentType: "application/json; charset=utf-8",
            dataType: "json",
            success: function(items) {
                $(event.target).children().remove();
                var html = "<div id='menuItemGroup" + event.data.MenuId + "' style='display:none'>";
                for (var j = 0; j < items.length; j++) {
                    html += "<div class='MenuItem'>
                    <a href='" + items[j].NavigateUrl + "'>" +
                    items[j].Text + "</a></div>";
                }
                html += "</div>";
                $(event.target).append(html);
                $("#menuItemGroup" + event.data.MenuId).slideDown(500);
            },
            error: function(err) {
                alert(err.status + " - " + err.statusText);
            }
        }
        )
}
The OnMenuClick() function
receives the event object as a parameter. The event object allows you to access
event specific data. The OnMenuClick event handler makes use of $.ajax() method
and this time calls the GetMenuItems() method of the WCF service. Notice how
the menuId parameter required by the GetMenuItems() method is passed as JSON
data.
The success function
essentially constructs a <DIV> element with ID as menuItemGroupXXXX where
XXXX is the MenuId of the menu being rendered. Individual menu items are put
inside this <DIV> as child <DIV> elements. A sample markup for a
menu and its menu items will look like this:
<div class='Menu'>
 MenuText1
 <div id="menuItemGroup1" style='display:none'>
    <div class='MenuItem'><a href='...'>Menu Item 1</a></div>
    <div class='MenuItem'><a href='...'>Menu Item 2</a></div>
    <div class='MenuItem'><a href='...'>Menu Item 3</a></div>
 </div>
</div>
It is quite possible that a
user may click on the same menu multiple times. To avoid menu items getting
added multiple times, first all the child elements of the menu <DIV> that
have been clicked need to be removed. This is done using children() and
remove() methods of jQuery.
The for loop iterates
through all MenuItem objects received as the results parameter. With each
iteration an HTML fragment consisting of menu item <DIV> and a hyperlink
pointing to the NavigateUrl property is formed. The complete HTML fragment is
then appended to the menu <DIV> clicked by the user. This <DIV> is
accessed using th target property of the event object.
Before showing the menu
items of the selected menu, previously expanded menus (if any) are collapsed.
This is done using slideUp() method of jQuery. The slideUp() method decreases
the height of an element from a higher to lower value giving a sliding up
animation effect. The parameter to slideUp() method indicates the duration in
milliseconds for this animation effect; the higher the value slower the
animation. Notice how the code selects the elements to apply slide-up effect.
It uses the "attribute starts with" selector of jQuery to select
<DIV> elements whose ID attribute starts with menuItemGroup. This way
container <DIV> elements of the menu items will be returned.
In order to show the newly
selected menu, the code makes use of the slideDown() method. The slideDown()
method acts exactly opposite to slideUp() in that it increases the height of an
element from lower to higher value. Notice how the code uses the MenuId value
using event.data object.
This completes the code
required to show an accordion menu. You can run the web form and see the
accordion menu in action.
Summary
In this article you
developed a database driven accordion menu. An accordion menu comes in handy
when there are many menu options and you wish to display only a subset at a
given time. Storing menu data in database tables gives added flexibility of
configuration. The menu data stored in the database can be easily retrieved
using a WCF service. The [WebInvoke] attribute enables RESTful access to a WCF
service. The $.ajax() method of jQuery allows you to call a WCF service method.
The animation effects provided by jQuery help us add some jazz during the
expand and collapse operations of the accordion menu.


