By Thiru Thangarathinam
In ASP.NET 2.0, caching has been improved in a couple of notable ways. Probably the most interesting feature is the introduction of database-triggered cache invalidation. In ASP.NET 1.x, you can invalidate a cached item based on some pre-defined conditions such as change in an XML file or change in another cache item. Using this feature, you can remove or invalidate an item from the cache when the data or another cached item changes. However, the ASP.NET 1.x Cache API does not allow you to invalidate an item in the cache when data in a SQL Server database changes. This is a very common capability most applications will require. ASP.NET 2.0 addresses this by providing the database triggered cache invalidation capability to ensure that the items in the cache are kept up-to-date with the changes in the database. You can accomplish this using any one of the following methods.
- Declarative Output caching – This is similar to declarative output caching in ASP.NET 1.x, wherein you configure caching by specifying the OutputCache directive and their related attributes.
- Programmatic Output caching – In this method, you will use the SqlCacheDependency object programmatically to specify the items to be cached and set their attributes.
- Cache API – In this option, you will use the static methods of the Cache class such as Insert, Remove, Add and so on to add or remove items from the ASP.NET cache, while still using the SqlCacheDependency object to trigger the cache invalidation.
SQL Server-Based Cache Invalidation Mechanism
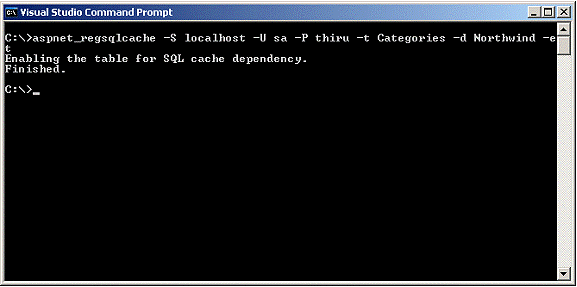
The SQL Server based cache invalidation mechanism works with SQL Server 7.0 and above. However, with SQL Server 7.0 and 2000, only Table level cache invalidation mechanism is supported. This means that the cached items will be automatically invalidated any time the data in the table changes. The next release of SQL Server (code-named Yukon) will also feature row-level cache invalidation mechanism, providing a finer level of accuracy over the cached data. In SQL Server 7 and SQL Server 2000, table level cache invalidation is supported using a polling system. Through this system, the ASP.NET process will poll the database (pull model) every so many seconds to check and see which tables have changed since it last checked. Even though the pull model works for most cases, it is not an efficient approach. However, this will be enhanced in Yukon to have Yukon actually notify (Push model) ASP.NET whenever a particular row of data has been modified. Yukon accomplishes this by using a feature called Notification Delivery Services (that uses ports 80), which directly interacts with HTTP.SYS of IIS 6.0 to notify the Web server of updates to the specific rows. For the purposes of this article, you will consider SQL Server 7 and 2000 and understand how to configure caching for those versions. Before you can establish cache dependency with SQL Server 7 or SQL Server 2000, you need to perform the following steps. After you have completed the above steps, ASP.NET can start invalidating the data in the cache when the SQL Server data changes, which is accomplished by a polling mechanism approach. Note that with Yukon, the above steps are not required. Before looking at the three different ways to enable SQL Server based caching, you should understand the steps that are required for the caching to work. First and foremost, you need to ensure your web.config file contains the appropriate cache related settings. The web.config file should contain a cache element as shown below. <?xmlversion="1.0"?> <configuration> <connectionStrings> <addname="Northwind" connectionString="server=localhost;database=Northwind;UID=sa;PWD="/> </connectionStrings> <system.web> <cache> <sqlCacheDependencyenabled="true"pollTime="1000"> <databases> <addname="Northwind" connectionStringName="Northwind" pollTime="1000"/> </databases> </sqlCacheDependency> </cache> </system.web> ——— ——— </configuration> In the above configuration entries, you specify the name of the database in which you want to enable the cache notification mechanism using the <cache> element. As you can see, there is a new section in web.config called <connectionString> in which the connection strings to the database is added. Once you add the connectionString to the connectionStrings section, you can then reference it from the sqlcachedependency/databases section. Next step is to enable the specific tables in the Northwind database for notification. You can perform this using any one of the following two ways: Once you configure the table to send notifications, any time data in the table changes, it notifies ASP.NET to invalidate the specific item in the cache. For the purposes of this article, consider the aspnet_regsqlcache utility to configure the tables. Basically this utility creates an extra table named AspNet_SqlCacheTablesForChangeNotification that is used to keep track of the changes to all the monitored tables in the database. It also creates a number of triggers and stored procedures to enable this capability. To run the aspnet_regsqlcache utility, open up the Visual Studio .NET command prompt and enter the command shown in the following screenshot. In the above command: S – Name of the Server As mentioned before, you need to follow the above steps only when you use SQL Server 7 or SQL Server 2000. If you are using the next version of SQL Server (code-named Yukon), the above configurations are not necessary. Moreover the cache invalidating mechanism works through a highly efficient notification model, wherein the Notification Delivery Service component of SQL Server directly notifies IIS using TCP Port 80 when the data in a SQL Server changes. Now that you understood the steps required for enabling this, take a look at the different ways of caching ASP.NET pages so that it takes advantage of SQL Server trigger based cache invalidation mechanism.
U – User ID to use to connect to the SQL Server
P – Password to use to connect to the SQL Server
d – Specifies the name of the database
t – Table to configure
et – enables the tables for SQL Server database triggered invalidation
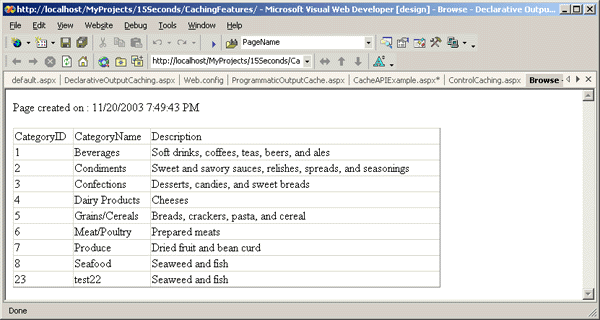
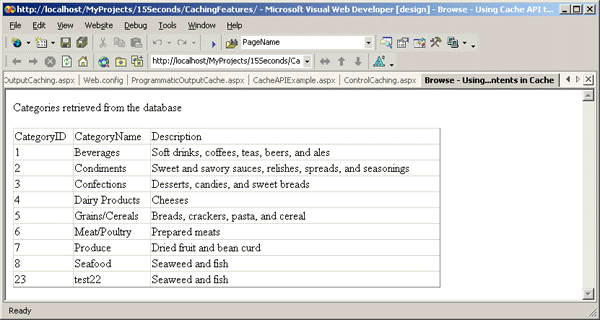
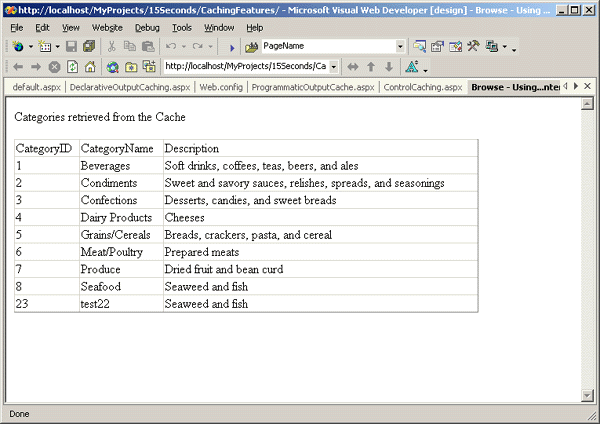
Declaratively enabling caching using OutputCache directive In this section, you will see how to enable output caching declaratively using the OutputCache directive. Here’s the complete code of the ASP.NET page. <%@ pagelanguage="C#"%> <%@ OutputCacheduration="3600"varybyparam="none"sqldependency="Northwind:Categories"%> <scriptrunat="server"> void { Response.Write("Page created on : " + DateTime.Now.ToString()); } </script> <html> <headrunat="server"> <title>Declarative Output Caching</title> </head> <body> <formrunat="server"> <asp:sqldatasourceid="categoriesSource"runat="server"selectcommand="Select providername="System.Data.OleDb"connectionstring="Provider=SQLOLEDB.1;Password=thiru;Persist </asp:sqldatasource> <asp:gridviewid="gridCategories"datasourceid="categoriesSource"runat="server"width="592px"height="160px"> </asp:gridview> </form> </body> </html> In the above code, you start by specifying the OutputCache directive at the top of the page. In the OutputCache directive, you specify the duration to which the page should be cached as well as the “none” value for the VaryByParam attribute that instructs ASP.NET to not cache multiple versions of the page based on parameters. Apart from these attributes, you also specify a new attribute named sqlcachedependency that is of the form <DatabaseName>:<TableName>. Because of this attribute, any time data in the Categories table of the Northwind database changes, the cached data will be automatically invalidated. The database name that you are specifying here should be defined in the connectionStrings section of the web.config file. Then in the Page_Load event, you display the date and time the page was created using the Response.Write statement. Inside the HTML body element, you declare a SqlDataSource control that acts as the data source for a GridView control. While declaring the SqlDataSource control, you also specify the SelectCommand, ProviderName and ConnectionString attributes. The SelectCommand attribute allows you to specify the SQL command to be executed and the ProviderName attribute allows you to indicate the type of provider to use for connecting to the database. As the name suggests, the ConnectionString attribute allows you to specify the connection string to be used for establishing connection with the database. Finally, you also declare a GridView control that is associated with the SqlDataSource control using the DataSourceID attribute. By setting the DataSourceID attribute of the GridView to the ID of the SqlDataSource control, you can automatically display the data returned from the SqlDataSource. Now that you understand the code, test the caching functionality by navigating to the page using the browser. When you do that, you will see an output that is somewhat similar to the following. If you refresh the page again, you will see the same time in the displayed output, which is due to the fact that you have enabled output caching on the page. Now to test the SQL Server based trigger invalidation, change the data in the Categories table in the Northwind database and refresh the page. You should now see a change in the time displayed in the page. This clearly shows that the SQL Server based trigger invalidation mechanism automatically invalidates the cached page as soon as the data in the categories table changes. Programmatic Output Caching In the previous section, you saw how to use the declarative OutputCache directive to specify the caching dependency on a SQL Server table. In this section, you will see how to perform the same operation programmatically. <%@ pagelanguage="C#"%> <%@ importnamespace="System.Data"%> <%@ importnamespace="System.Data.SqlClient"%> <scriptrunat="server"> void { SqlConnection conn = new SqlConnection( ConfigurationSettings.ConnectionStrings["Northwind"]); SqlDataAdapter adapter = new SqlDataAdapter("Select * from DataSet categories = new DataSet(); adapter.Fill(categories); SqlCacheDependency dependency = new SqlCacheDependency("Northwind", "Categories"); Response.AddCacheDependency(dependency); Response.Cache.SetValidUntilExpires(true); Response.Cache.SetExpires(DateTime.Now.AddMinutes(60)); Response.Cache.SetCacheability(HttpCacheability.Public); gridCategories.DataSource = categories; gridCategories.DataBind(); Response.Write("Page created on : " + DateTime.Now.ToString()); } </script> <html> <headrunat="server"> <title>Programmatically Controlling Output </head> <body> <formrunat="server"> <asp:gridviewid="gridCategories"runat="server" width="592px"height="160px"> </asp:gridview> </form> </body> </html> The above code is similar to the previous example except that the caching is performed programmatically. In the Page_Load event, you create an instance of the SqlConnection object and pass in the connection string as an argument. To retrieve the connection string from the web.config file, you use one of the new classes supplied by ASP.NET 2.0, named ConnectionStrings, that provides helper properties to retrieve the connection strings specified in the connectionStrings section of the web.config file. You then create an instance of the SqlDataAdapter object passing in the SQL to be executed and the SqlConnection object as its arguments. After that you create an instance of the DataSet object and then fill the dataset object by invoking the Fill method of the SqlDataAdapter object. Then you create an instance of the class named SqlCacheDependency passing in the database and the table to be monitored as its arguments. You also add the SqlCacheDependency object to the Response object using the AddCacheDependency method. After that, you set various attributes of the Cache object. Finally, you bind the output of the returned data to the GridView control. Navigating to the above page results in an output that is similar to our previous example. To test this page, change the data in the categories table and see the change in the date time displayed in the page. Cache API Example So far, you have seen how to use the output caching declaratively and programmatically to enable caching on ASP.NET pages. In this section, you will see how to use the Cache API to accomplish the same functionality. As in ASP.NET 1.x, the Cache API is very powerful in that it not only provides complete control over how items are cached but also enables the execution of some code when an item is removed or invalidated from the cache. The following code shows an example of using Cache API to control caching for an ASP.NET page. <%@ pagelanguage="C#"%> <%@ importnamespace="System.Data"%> <%@ importnamespace="System.Data.SqlClient"%> <scriptrunat="server"> void { DataSet categories; categories = (DataSet)Cache["Categories"]; if { SqlConnection conn = new SqlConnection( ConfigurationSettings.ConnectionStrings["Northwind"]); SqlDataAdapter adapter = new SqlDataAdapter("Select categories = new DataSet(); adapter.Fill(categories); SqlCacheDependency dependency = new SqlCacheDependency("Northwind", "Categories"); Cache.Insert("Categories", categories, Response.Write("Categories retrieved from the database"); } else Response.Write("Categories retrieved from the Cache"); gridCategories.DataSource = categories; gridCategories.DataBind(); } </script> <html> <headrunat="server"> <title>Using Cache API to store contents in </head> <body> <formrunat="server"> <asp:gridviewid="gridCategories"runat="server"width="592px" height="160px"> </asp:gridview> </form> </body> </html> The above code is very similar to the previous example, except in this case, the Insert method of the Cache class is used to add items to the cache. In the above code, you start by creating an instance of the SqlConnection object passing in the connection string that is retrieved from the web.config file. Then you create an instance of the SqlDataAdapter object and pass in the SQL statement to be executed and the previously created SqlConnection object as its arguments. Then you execute the SQL query using the Fill method of the SqlDataAdapter object. After that you create an instance of the SqlCacheDependency object and supply the database name (that corresponds to the database name specified in the web.config file) and the table name as its arguments. Then you insert the categories dataset to the cache using the Insert method of the Cache object. At the time of inserting, you should also specify the SqlCacheDependency object so that the categories dataset can be invalidated when the data in the categories table changes. Finally, you sould bind the categories dataset to the GridView control. When you navigate to the above page using the browser, you get the following output, which clearly shows that for the first time the categories information is retrieved from the database. If you refresh the browser, you will see the following output, in which the categories information is retrieved from the cache. To test if the SQL Server based cache invalidation mechanism works, modify the data in the Categories table and then if you navigate to the page using the browser, you will get a message stating that the categories is retrieved from the database.
Page_Load(object sender, System.EventArgs e)
* from Categories"
Security Info=True;User ID=sa;Initial Catalog=Northwind;Data
Source=localhost;Use Procedure for Prepare=1;Auto Translate=True;Packet
Size=4096;Workstation ID=THIRU-SERVER;Use Encryption for Data=False;Tag with
column collation when possible=False">
Page_Load(object sender, System.EventArgs e)
Categories",conn);
Cache</title>
Page_Load(object sender, System.EventArgs e)
(categories == null)
* from Categories", conn);
dependency);
Cache</title>
Creating Custom Cache Dependencies
So far, you have used the built-in SqlCacheDependency class for invalidating the cached item when the data in the SQL Server database changes. Even though this approach is very useful, there are times you might want to create your own custom cache dependency. For example, when the stock price changes, you might want to invalidate an item in the cache. ASP.NET 2.0 Cache API enables these types of scenarios by providing the ability to create custom cache dependency classes that are inherited from the CacheDependency class.
Conclusion
The Cache API introduced with ASP.NET 1.0 was a powerful feature that could be immensely useful in increasing the performance of a Web application. The Cache API in ASP.NET 2.0 builds on the foundation provided by the ASP.NET 1.0 and makes it extremely easy and seamless to build high performance ASP.NET applications. Being able to invalidate a cached item when the data in the database changes is a capability that can go a long way in revolutionizing the way ASP.NET applications are built and deployed. Furthermore, the ability to create custom cache dependencies (when one of the built-in cache dependency classes does not suit your needs) enables a whole lot of impressive caching scenarios for the developers to take advantage of.
About the Author
Thiru has many years of experience in architecting, designing, developing and implementing applications using Object Oriented Application development methodologies. He also possesses a thorough understanding of software life cycle (design, development and testing). He is an expert with ASP.NET, .NET Framework, Visual C#.NET, Visual Basic.NET, ADO.NET, XML Web Services and .NET Remoting and holds MCAD for .NET, MCSD and MCP certifications. Thiru has authored numerous books and articles. He can be reached at thiruthangarathinam@yahoo.com.


