Templates can help you jump start your TSQL code writing. The SQL Server team at Microsoft provided a lot of TSQL code templates work out of the box. But did you know you can add to the available templates by creating your own?
Read: Exploring Templates in SQL Server Management Studio.
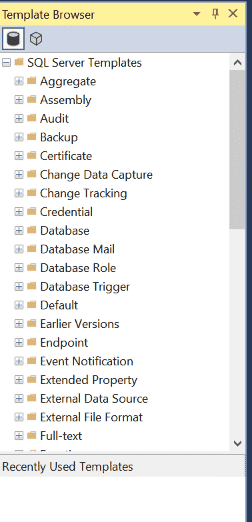
To create a code template, you must first open the “Template Browser”. This is done by either using the Ctrl+Alt+T shortcut or by clicking the “Template Explorer” item under the “Edit” menu item in the SQL Server Management Studio (SSMS) main menu. When doing this, the “Template Browser” dialog menu will display, as shown below:

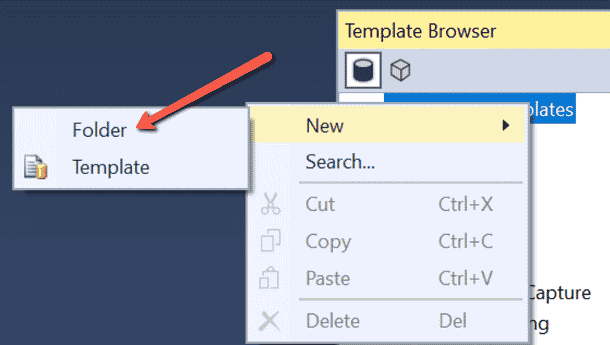
When you create new templates, you can create them in an existing folder or create a new folder just for your templates. To create a new template folder, right-click on the “SQL Server Templates” item shown in the above screenshot. Then hover your mouse over the “New” item in the context menu and then click on the “Folder” item as shown below:

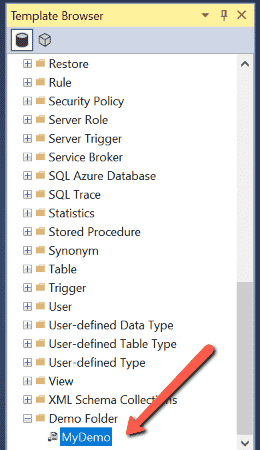
When you do this, a new folder will be added to the bottom of the template list and you will be given the chance to name the folder anything you would like. For demonstration purposes, I created a folder named “Demo Folder”.
To create a new template in a folder, right-click on the folder in which you’d like to create the new template. For this demo, I will be creating a new template in the newly created folder (“Demo Folder”) that I just created. When I right-click on the “Demo Folder” the same context menu shown above will be displayed. This time instead of picking the “Folder” item, I will pick the “Template” item and then name my new template “MyDemo” as shown below:

To build the TSQL code for the “MyDemo” template, right-click on the item and then select the “Edit” item from the context menu. Upon doing this, a new query window will be displayed called “MyDemo.SQL”. I can now write the code for my demo template in this new window. For the “MyDemo” template, I will be typing the code below into the new query window. This code will show the top 10 worst performing TSQL commands in the procedure cache, based on the number of times it has been executed:
SELECT TOP 10 QP.query_plan AS [Query Plan],
       ST.text AS [Query Text],
       QS.creation_time AS [Creation Time],
       QS.last_execution_time AS [Last Execution Time],
	   QS.execution_count AS [Execution Count],
	   QS.total_worker_time AS [Total CPU Time],
	   QS.total_logical_reads AS [Logical IO Count]
FROM sys.dm_exec_query_stats AS QS
   CROSS APPLY sys.dm_exec_query_plan(QS.plan_handle) AS QP
   CROSS APPLY sys.dm_exec_sql_text(QS.plan_handle) ST
ORDER BY [Execution Count] DESC;
At this point, if we didn’t have any parameters that we wanted or needed to support we could close and save the query window. But for our demo, we want to add one parameter to our template. The parameter will be used to adjust the number of rows returned from this query. The parameter we will create allows us to change the “Top 10” text in the code above to the number of rows we identify for the parameter, or, if we don’t want to change the value of the number of rows returned the the template, it will use the default value, which will only returns 10 rows. To add a parameter, we modify the code above to look like this:
SELECT TOP  P.query_plan AS [Query Plan],
       ST.text AS [Query Text],
       QS.creation_time AS [Creation Time],
       QS.last_execution_time AS [Last Execution Time],
	   QS.execution_count AS [Execution Count],
	   QS.total_worker_time AS [Total CPU Time],
	   QS.total_logical_reads AS [Logical IO Count]
FROM sys.dm_exec_query_stats AS QS
   CROSS APPLY sys.dm_exec_query_plan(QS.plan_handle) AS QP
   CROSS APPLY sys.dm_exec_sql_text(QS.plan_handle) ST
ORDER BY [Execution Count] DESC;
As you can see, we changed the value “10” in our original code to look like this:
<How Many Rows To Return,int,10>
The text between the less than “<” and greater than “>” characters denotes the parameter we added. There are three different parts of defining a parameter, each separated with a comma “,”. The first part is the name of the parameter. In our case that parameter is called “How Many Rows To Return”. The second part is the data type. For that, we specified “int”. The last part is the default value.
The last step in creating our template, is to just save the code in our “MyDemo.SQL” query window. We can do that by just closing the window.
That is all there is to creating a custom TSQL code template that contains a parameter. Next time you have some code that you use over and over again, consider creating a template for your commonly used code. By using templates, you can quickly create and modify sample code using parameters.

